How to do everything on Tevalis
How to Access Back of House
1) On any POS terminal log in using your code, card, finger print or iButton.
2) When in sales mode press System top right.
a. You will only see the system button if you have the correct access levels.
PRODUCT
How to add a Product
1) Whilst in CM hover over Products on the blue bar and press Product.
2) Press Add at the top.
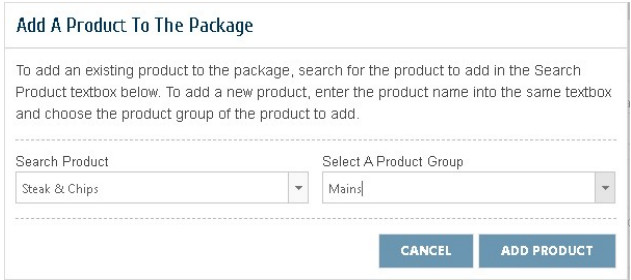
3) A pop-up will appear, give the new product a Name and choose the Product Group from the dropdown toolbar.
4) When you start typing the name, the search bar will look for any deleted products and any products that exist within other packages. If it finds any and you select it then press Add Product this will pull the product across from either deleted products or other packages.
5) Press Add Product.
6) By default, a new product will have no measure. In order to sell a product you must assign a measure by pressing edit next to the measure and choosing one from the dropdown toolbar (a product can have multiple measures e.g. spirits 25ml/700ml and 50ml/700ml).
a. To add another measure, press Add new record underneath the word measure.
b. If the measure you require is not in the dropdown you will need to create the measure first.
c. Generally, the measure each is used for food items and any items that are sold as a whole.
d. You can delete a measure by pressing Delete next to the measure.
7) The Tax Group will default to standard. Amend where applicable by selecting the dropdown toolbar on the measure.
8) Input a Gross selling price on the measure.
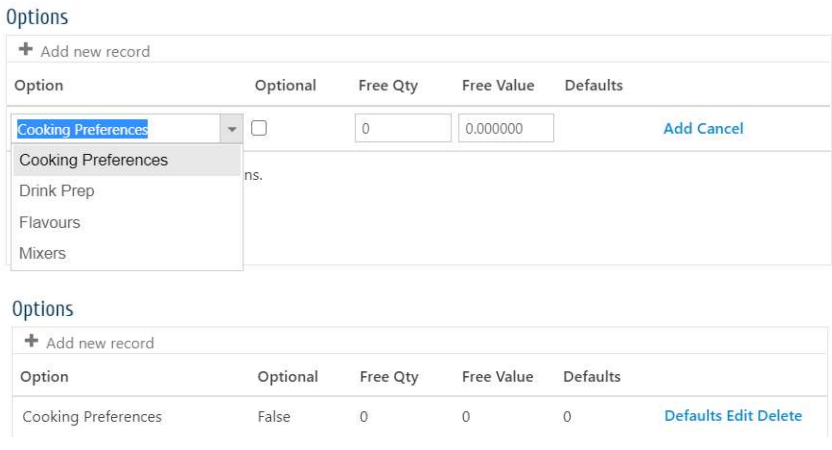
9) Attach any applicable options by pressing add new record under the word Options, select the option group from the dropdown toolbar and press Add.
a. If you do not tick the box (false) under Optional this will mean your option group will automatically pop-up every time the product is selected.
b. If you tick the box (true) under Optional this makes the option group optional, meaning it will not pop up every time you select the product. To make the option group appear you must push a function key called ‘Optional Option’ on the sales mode.
c. If the option you require is not in the dropdown you must create it first.
d. To delete an option group press, Delete next to the option.
How to copy a Product
You can copy an existing product, by selecting a similar product to the one you want to create, pressing copy, and then changing the product name and selling price. This is a useful tool for creating new products quickly.
1) Use the navigation panel on the left search for an existing product that is similar to the one you want to create and select it. e.g. if you are creating a new red wine select an existing red wine to copy.
2) Select Copy at the top.
3) It will ask if you are sure, pressing OK will copy the product. Pressing Cancel will not.

4) This will create you a brand-new product with the same name (with Copy at the end), measures, selling price, options, kitchen text, and product information.
5) Edit any relevant details as necessary and press Save top right. You must then remember to create the button for this product in EPOS Designer
How to Delete Products
1) Select the product you wish to delete from the navigation panel on the left.
2) Select it and press Delete at the top.
3) The system will ask you if you are sure you want to do this.
a. Selecting Ok will delete the product.
b. Selecting Cancel will not delete it.
How to edit an existing Product
1.) Select the product you wish to edit from the navigation panel on the left.
2.) The details will appear on the right which you can edit.
3.) When you are finished editing press Done top right.
a. Note – if you change the measure of a product you must update the button in EPOS Designer and point it to the new measure.
MODIFIERS (OPTION)
How to add an Option Group (Modifier Group)
1) Whilst in CM hover over Products on the blue bar and press Options.
2) Press Add at the top.
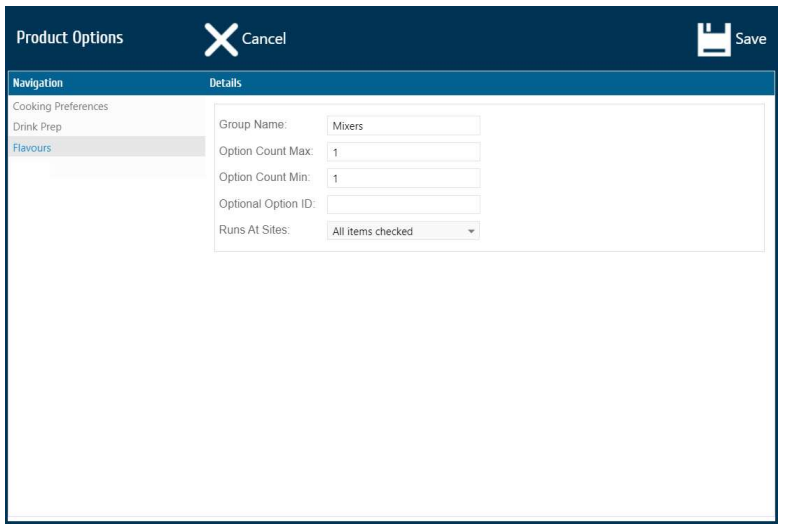
3) Give the new option group a name typing in the Group Name box.
4) Input the Max and Min Option Count (0 means unlimited).
a. This is where you enter the maximum and minimum amount of options the POS user can select from the option group e.g. ice cream flavours have a maximum of 3 as they can only choose 3 flavours and a minimum of 1 as they must choose at least 1 flavour.
5) Press Save, top right
6) After you have pressed save you can add products into the option group by using the Search Products box. Once you type in 3 characters the system will search existing products, choose the correct product and measure then press add option item.

7) To delete a product from the option group press Delete to the right of the relevant product.

8) You can also add Text Only Options to the group. This is for when items do not need to deplete stock or be tracked in the Tevalis reporting module e.g. cooking preferences (rare, medium rare etc.)
9) To do this type in the Text Only Option box at the top and press add. It will add to the bottom of the Option Group and look like the below 
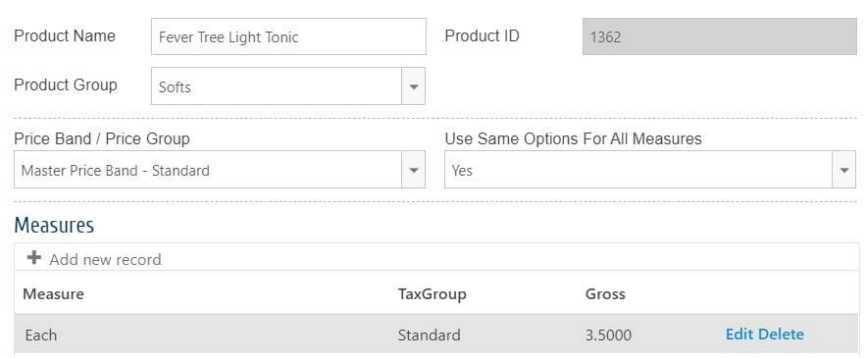
10) If you leave the Price field at -1 it does not mean it will charge -£1. It means it will charge whatever the normal price of the product is e.g. Fever Tree Light Tonic in the option group above has a selling price of £3.5, which can be found by navigating to Products. Therefore, with the price of -1 in the option group every time Fever Tree Light Tonic is selected as a mixer it will charge £3.5.
a. If you want to charge a different price for the product when it is sold as an option, change the price in the price field within the option group.
How to copy an Option Group
1) Using the navigation panel on the left, find and select the option group you wish to copy.
2) Press Copy, top middle.
3) The system will ask you if you are sure you want to do this.
a. Selecting Yes will copy the option group and everything that sits within it.
b. Selecting No will not copy it.
How to delete an Option Group
When you delete an option group it will remove it from any products it is attached to.
1) Using the navigation panel on the left, find and select the option group you wish to delete.
2) Press Delete top middle.
3) The system will ask you if you are sure you want to do this.
a. Selecting Ok will delete the option group and everything that sits within it.
b. Selecting Cancel will not delete it.
How to edit an existing Option Group
1) Select the option group you wish to edit from the navigation panel on the left.
2) The details will appear on the right which you can edit.
3) When you are finished editing press Done, top right.
DISCOUNTS
How to add a Configurable Discount
1) Whilst in CM hover over Products on the blue bar and press Discounts.
2) Press Add at the top.
3) Give the discount a name by typing in the Name box.
4) Select the reason (this is how the discount will track in the reporting module)
5) Input the discount amount (in this example it’s 25%).
6) If your discount is a percentage, tick the box Discount by Percentage on the right otherwise the system will discount a monetary amount (in this example £25).
7) Runs from and to dates (if your discount is to run indefinitely then leave the same start and end date as it is).
8) You can choose which price groups the discount will work in by selecting them from the Available Price Groups dropdown toolbar.
9) Choose the products the discount should work on by expanding and product types under Discounted Products and ticking the relevant products.
a. If you tick a product type/group, it will automatically tick all products within that type/group.
b. You can expand all the way down to the measure of a product (e.g. selecting only small glasses of wine).
10) If you require managers to authorise using this discount tick Requires Manager Override.
11) Press Save top right.
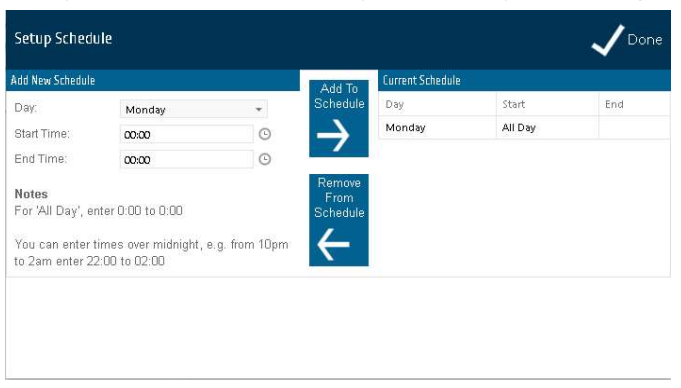
12) You can set a schedule for the discount to work only on specific days of the week at certain times. You do this by pressing Change Schedule.
a. This will prompt the schedule window where you add and amend the schedule.
b. You can only set the discount schedule once you have saved your new configurable discount.
How to delete a Configurable Discount
1) Select the configurable discount you wish to delete from the navigation panel on the left.
2) Press Delete.
3) The system will ask you if you are sure you want to do this.
a. Selecting Ok will delete the configurable discount.
b. Selecting Cancel will not delete it.
How to edit an existing Configurable Discount
1) Select the configurable discount you wish to edit from the navigation panel on the left.
2) The details will appear on the right which you can edit.
3) When you are finished editing press Done, top right.
PRICE GROUPS
Price groups are a tool for selling products at multiple prices without having duplicated products.
How to add a Price Group
1) Whilst in CM hover over Products on the blue bar and press Price Groups.
2) Press Add at the top.
3) Give the new price group a name by typing in the Name box.
4) The Prefix box can be populated by typing in the box, anything written here will print at the dispense printers and on the customer receipt before a product name when in the relevant price group e.g. takeaway, prefix T/A. You do not have to type anything, if you do use a prefix make sure you add a space at the end.
5) Select the Default TaxGroup from the dropdown toolbar.
a. When giving products a price within this price group they will default to this tax group e.g. for takeaway if most products do not incur VAT charges you can set the default tax group to exempt.
6) If you do not wish to charge service charge in the price group tick Service Charge Exempt.
7) Press Save, top right.
How to delete a Price Group
It is not possible to delete price groups. Please contact the Support team on 0330 002 1555 or support@tevalis.com if you want to delete a price group. A suggestion would be to rename the price group you wish to be deleted to Delete Me so it is clear which group needs deleting.
1.) Select the price group you wish to delete from the navigation panel on the left.
2.) Press Delete.
3.) The system will ask you if you are sure you want to do this.
a. Selecting Yes will delete the price group.
How to edit an existing Price Group
1.) Select the price group you wish to edit from the navigation panel on the left.
2.) The details will appear on the right which you can edit.
3.) When you are finished editing press Done, top right.
How to use the Price Group Scheduler
The price group schedule is used in conjunction with price groups to trigger the POS to automatically switch between price groups on specific days/times e.g. happy hour on weekdays between 2pm and 6pm. Existing price schedules appear on the left in the navigation panel.
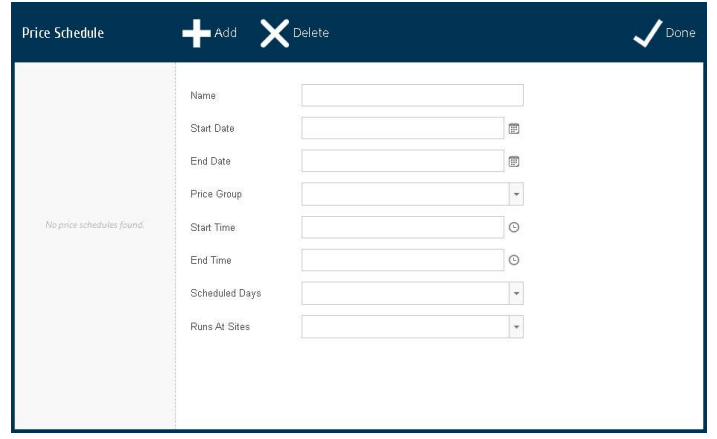
1) Whilst in CM hover over System on the blue bar and press Price Schedule.
2) Press Add at the top.
3) Give the price group schedule a name by typing in the Name box.
4) Select the start and end date that you want this schedule to run from/to.
a. If you want it to run indefinitely put the end date far in the future.
5) Select the price group you wish to switch to during the schedule using the Price Group dropdown.
6) Select the start and end time for the schedule using the Clock Symbols or typing.
7) Select the Days of the Week you want to include in the schedule from the Scheduled Days dropdown
toolbar.
8) Choose which sites you want this schedule to run at using the Run at Sites dropdown toolbar.
9) Press Save, top right. 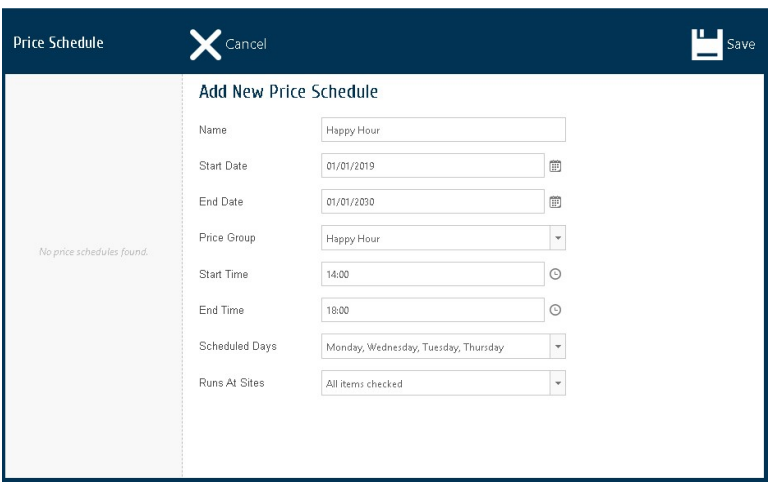
PRINTER GROUPS
How to add a Printing Group
1) Whilst in CM hover over Products on the blue bar then Advanced then press Print Groups.
2) Press Add at the top.
3) Give the print group a name typing in the Print Group Name box.
4) Give the print group a Print Order number.
a. The Print Order determines in which order the print groups display on the kitchen/bar print out. The lower the number the higher up the print group will display on the print out e.g. starters – 1, mains – 2, desserts – 3.
5) If you are using KMS make sure the same number is in the Course field.
6) Press Save, top right.
TABLE RULES
How to add a Set Sales Area Table Rule
1.) Back of house > System Options > Edit Table Rules > Press Add at the top.
2.) Give the table rule a name
3.) Select the rule Set Sales Area by using the dropdown toolbar next to Rule.
4.) In the Parameters box type in the sales area name
a. This must match the existing sales area name exactly.
5.) To attribute the tables to the rule using the Table Filter you can either use Table Range, specifying which tables From and To the rule applies to or you can select by Table Area.
a. Table areas are pulled through from the floorplan
b. If you choose to use table range, you may have to create more than one rule if the table numbers do not run sequentially.
6.) Press Save, top right.
How to add a Set Service Charge Percentage Table Rule
1.) Press Add at the top
2.) Give the table rule a name
3.) Select the rule Set Service Charge Percent by using the dropdown toolbar next to Rule.
4.) In the Parameters box type in the service charge percentage e.g. 15
5.) To attribute the tables to the rule using the Table Filter you can either use Table Range, specifying which tables From and To the rule applies to or you can select by Table Area.
a. Table areas are pulled through from the floorplan
b. If you choose to use table range it is worth keeping in mind you may have to create more than one rule if the table numbers do not run sequentially.
6.) Press Save, top right.
MAKING CHANGES IN BULK
How to use the Multi-Programming tool
1.) Back of house > Product Admin, then Advanced > Multi-Programming.
2.) Using the navigation panel on the left expand the product types and product groups and select which products you wish to apply changes to.
a. If it is a whole type or group, select the box next to the type/group name and select all products within that type / group.
3.) Use the Details panel on the right to choose what you want to change.
a. In the example image below the product group Desserts is highlighted and dispense printer 4 is selected (green). Once saved all Desserts will print at dispense printer 4.
4.) Press Save, top right.
5.) To change the product group of selected products, use the dropdown next to Product Group.
6.) To change the tax group of selected products, use the dropdown toolbar next to Tax Group.
7.) To change the commission % of selected products, use the keyboard next to Commission % box.
8.) To turn Prohibit Sales When Under Stocked on for selected products press the box to make it green.
9.) To turn Do Not Display Stock On Key on for selected products press the box to make it green.
10.) To turn Allow Zero Priced Sales on for selected products press the box to make it green.
11.) To adjust the pricing of the selected products choose from the Pricing Adjustment Type dropdown toolbar to either % Add, % Minus, Amount Add or Amount Minus.
How to use the Options Multi-Programming tool
1.) Back of house > Product Admin > Advanced > Options MultiProgramming.
2.) Using the navigation panel on the left expand the product types and product groups and select which products
a. If it's a whole type or group, select the box next to the type/group name and it will select all products within that type / group.
3.) Use the Details panel on the right to choose which option group you want to add / replace existing options with.
a. In the example image below the product group ‘Spirits’ is selected on the left and the ‘Mixer Option Group’ is selected on the right.
4.) Press either Add Option or Replace Option.
a. Add option will add the chosen option group to all selected products.
b. Replace option will remove existing options attached the products selected and then add the selected option group.
5.) When finished press Done, top right.